Getting Started with Zephyr on RA Microcontrollers
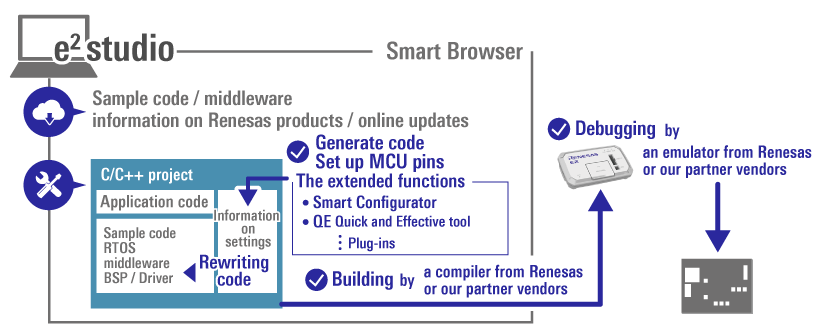
Developing firmware for a Microcontroller typically requires a number of components; an IDE, a toolchain and an SDK for the target MCU. A lot of semiconductor vendors provide all of these in a single package, making installation easy. For RA Microcontrollers, Renesas provides the FSP Platform installer. This is a single file which once downloaded and installed provides an IDE (the Eclipse based e2 Studio), a complete cross compilation toolchain and a set of drivers and middleware (the Flexible Software Package or FSP).
By contrast, getting started with the Zephyr RTOS on Renesas RA Microcontrollers requires the installation of a number of different components and is therefore a multi-step process.
Prerequisites
To get started using Zephyr on Renesas RA Microcontrollers you will need the following:
- An RA Microcontroller Evaluation Kit board and associated cable(s) i.e. an EK-RA6M4 etc.
- A GitHub account.
Install the Zephyr Development Environment
The first step is to install and configure a Zephyr Development Environment. This requires installing a number of dependencies (such as CMake, Python etc.), the Zephyr RTOS itself and a Zephyr SDK (toolchain). Follow the steps in the Zephyr Getting Started guide to get your development environment setup:
Getting Started Guide — Zephyr Project Documentation
NOTE: When you get to the step titled “Build the Blinky Sample” build for whichever Renesas RA Evaluation Kit you have at hand. For example, if you have an EK-RA6M4 then use the following commands to build and flash:
west build samples/basic/blinky -b ek_ra6m4 -p always
west flash
After following these instructions, you should have a fully functioning Zephyr Development Environment which you have just proved out by building and flashing a simple blinky example into a Renesas Evaluation Kit board.
Using Visual Studio Code
The next step is to install an IDE that it will make it easier to edit and debug applications. We will use Visual Studio Code (VS Code) as it contains a lot of extensions that support MCU development and the Zephyr RTOS.
Downloading and installing VS Code
Download and install VS code using the following link:
Install VS Code Extensions
Start VS Code and install the following extensions:
- Cortex-Debug (by marcus25)
- MemoryView (by mcu-debug)
- Peripheral Viewer (by mcu-debug)
Editing and Building with VS Code
Now let’s use VS Code to edit the blinky sample to flash a different LED, then rebuild and flash into the evaluation kit board.
Modifying the Blinky Sample using VS Code
First open the zephyrproject folder from within VS Code (File->Open Folder…).
NOTE: As a result of this operation VS Code will create a folder named
.vscode within your zephyrproject folder.
Next, open the device tree definition for the board you are using. I’m using an
EK-RA6M4 so I open the zephyr/boards/renesas/ek_ra6m4/ek_ra6m4.dts file.
The blinky samples looks in this file for the led0 alias to determine which
LED to blink. It is currently set to led1 so let’s change that to led2 as
follows:
aliases {
	led0 = &led2;
	sw0 = &button0;
	sw1 = &button1;
	watchdog0 = &wdt;
}
NOTE: After modifying the file, remember to save it!
Build and Flash the Blinky Sample
Open a terminal from within VS Code (Terminal->New Terminal) and you should see a terminal open at the bottom of the screen and your previously created Python virtual environment should have been automatically activated. If not, then start the virtual environment by entering the following command in the terminal:
zephyrproject/.venv/Scripts/Activate.ps1Now build the blinky sample by entering the following into the terminal:
west build samples/basic/blinky -b ek_ra6m4 -p alwaysFinally, flash the modified sample into your evaluation kit board:
west flashYou should now see a different LED flashing on your evaluation kit board!
Debugging with VS Code
Next, we will configure VS Code so that we can debug the blinky example.
Creating a launch configuration
First you need to create a file called launch.json in the .vscode folder. Once you’ve done this add the following to this file:
{
    "version": "0.2.0",
        "configurations": [
        {
            "name": "Renesas EK-RA6M4",
            "request": "launch",
            "device": "R7FA6M4AF",
            "deviceName": "R7FA6M4AF",
            "processorName": "cm4",
            "servertype": "jlink",
            "interface": "swd",
            "type": "cortex-debug",
            "gdbPath": "${userHome}/zephyr-sdk-0.17.4/arm-zephyr-eabi/bin/arm-zephyr-eabi-gdb",
            "cwd": "${workspaceFolder}",
            "executable": "zephyr/build/zephyr/zephyr.elf",
            "showDevDebugOutput": "raw",
            "runToEntryPoint": "main"
        },
    ]
}
If you are not using an EK-RA6M4 board then you will need to change the following to match the details of the board you are using:
"device": "R7FA6M4AF",
"deviceName": "R7FA6M4AF",
"processorName": "cm4",
If you are using Zephyr SDK version 1.0.0 you need to change the following line:
"gdbPath": "${userHome}/zephyr-sdk-0.17.4/arm-zephyr-eabi/bin/arm-zephyr-eabi-gdb",to:
"gdbPath": "${userHome}/zephyr-sdk-1.0.0/gnu/arm-zephyr-eabi/bin/arm-zephyr-eabi-gdb",Starting the Debugger
Now that we have configured VS Code we just need to launch the debugger. To do this, click on the “Run and Debug” icon in the left-hand side bar:

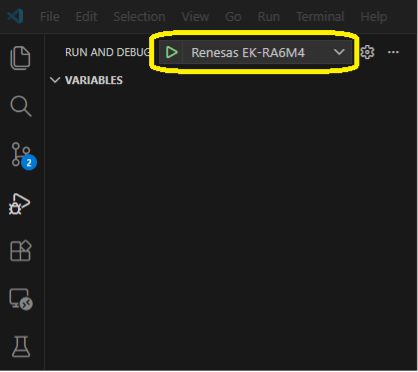
You should now see launch configuration created previously appear in the debug control menu:
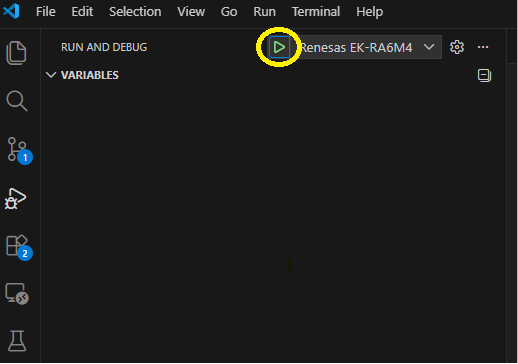
Press the green start button next to the launch configuration to start the debug session:
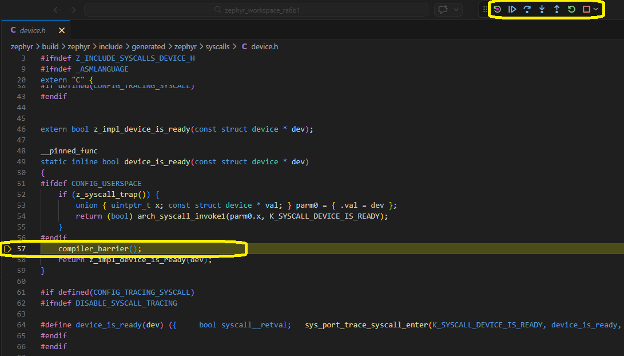
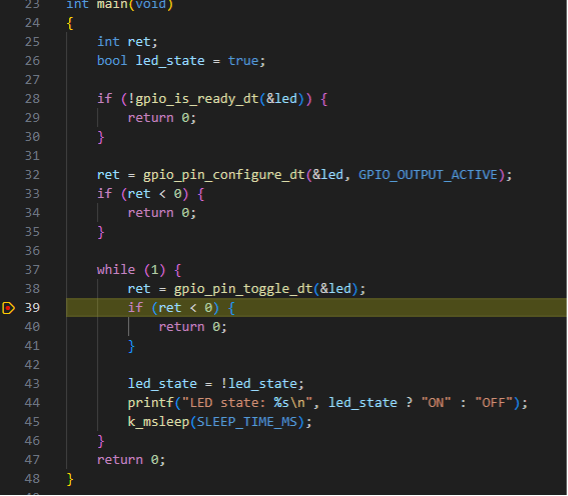
If this is successful, the debugger controls will appear at the top of the screen and execution will be halted just before entering main:
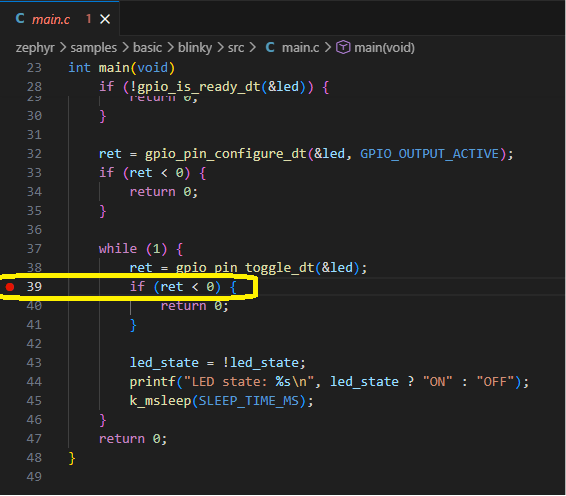
Open the main blinky source file (samples/basic/blinky/src/main.c) and place
a breakpoint just after the line that toggles the LED:
Now let the debugger run the blinky sample by pressing the “run” button:

Execution should stop at the break point in main and the LED should be off:
Pressing run again will allow the loop to be executed one more time, the LED will be turned on and execution will again halt at the break point. You can also use the debug controls to reset execution and single step through the code.
And that’s it, you can now edit, build, flash and debug Zephyr RTOS based code using VS Code!